Prepaid eSIM Plans Explained: Costs, Coverage, and How to Activate
Tired of hunting for a local SIM card the moment you land in a new country? A prepaid eSIM solves that by letting you buy and activate a data plan online before you even board the plane. It works by downloading a digital profile straight to your phone, so you can switch networks in seconds without swapping a physical card. Just scan a QR code, pick a plan that fits your trip, and you’re connected the second you arrive.
What Exactly Is a Prepaid eSIM and Why Would You Want One?
A prepaid eSIM is a digital SIM card that you purchase and activate online, downloading its profile directly onto your phone’s built-in eSIM chip. It comes with a set data allowance or talk/text bundle, and you pay upfront, with no contract or post-paid billing. You want one primarily for instant connectivity when traveling, as you can buy and install it before you leave, avoiding physical SIM swaps or roaming fees. It also lets you keep your primary physical SIM active for calls, while using the prepaid eSIM for local data. You can compare and switch between multiple prepaid eSIM plans through a single app, giving you flexible control over costs without lengthy commitments.
How a Digital SIM Differs From a Physical Plastic Card
A digital SIM ditches the plastic card entirely. Instead of slotting a physical chip, your phone holds a tiny, rewritable profile. With a prepaid eSIM, there’s no card to lose or damage. You scan a QR code or download a profile, and the network connects instantly. A physical SIM requires you to hunt for a tray, fiddle with a pin, and swap cards if you change plans. With digital, you can switch carriers in minutes from your settings, even test multiple prepaid plans on the same phone. If you run out of data, you just top up online—no waiting for a new card to arrive, no tiny plastic pieces cluttering your drawer.
- Scan the QR code or install the profile—no physical insertion needed.
- Manage and switch between multiple prepaid plans directly in your phone’s settings.
- Activate a new line instantly with just a data connection, bypassing the mail or store trip.
The Core Advantages of Paying Upfront for Cellular Data
Paying upfront for cellular data with a prepaid eSIM delivers immediate cost certainty, eliminating surprise post-trip bills or hidden roaming fees. Prepaid data budgeting becomes effortless because you purchase a fixed data allowance, locking your exact expenditure before connecting. This model also removes credit checks and long-term contracts, granting total control over when and how much connectivity you buy. Furthermore, you avoid auto-renewal traps, as service simply ends when data depletes or time expires. It effectively forces you to evaluate your real consumption, preventing overbuying for light usage patterns. Ultimately, the upfront payment guarantees zero financial liability beyond the initial fee, making it the most predictable option for temporary or travel connectivity.
How Does a Prepaid eSIM Actually Work on Your Phone?
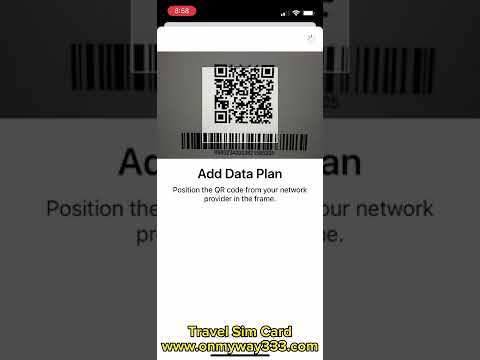
A prepaid eSIM is simply a digital profile you buy and download directly to your phone’s built-in chip, skipping the physical plastic card entirely. When you purchase a plan, you get a QR code or an instant activation link; scanning or tapping it downloads the carrier’s profile onto your device’s secure element. Your phone then treats it like a normal network connection, but with a prepaid balance you already paid for. It works because your device stores the SIM data in software, letting you switch profiles in Settings without swapping cards. The key insight?
You’re essentially renting a temporary digital identity that your phone activates and deletes as needed, so you can go online the moment you install it—no store visit required.
After setup, data and texts simply deduct from your prepaid credit until it runs out.
Scanning a QR Code vs. Manual Installation Steps
When activating a prepaid eSIM, scanning a QR code versus manual installation steps determines speed versus control. Scanning the provider’s QR code instantly downloads the eSIM profile—typically done in under a minute—and auto-fills APN and SM-DP+ settings, reducing user error. Manual installation requires entering the activation code, SM-DP+ address, and confirmation code into your phone’s cellular settings, which takes longer but allows you to verify each parameter before saving. For most prepaid users, QR scanning is the faster, safer default, as it eliminates typos in long alphanumeric strings. Manual entry remains useful when QR delivery fails, such as when emailing a PDF screenshot, but demands meticulous attention to case-sensitive characters. Choose QR when available; reserve manual steps for troubleshooting.
QR code scanning offers one-step, error-proof prepaid eSIM activation, while manual entry provides a slower, hands-on backup method for when QR codes are unavailable or corrupted.
Understanding the Difference Between Data-Only and Full Service Plans
When choosing a prepaid eSIM, the core distinction lies in what the plan provisions. A data-only prepaid eSIM grants access solely to cellular internet, lacking a native number for calls or SMS; this suits tablets, hotspots, or a secondary device where voice is redundant. Conversely, a full service plan bundles a virtual phone number, voice minutes, and texting alongside a data allowance, enabling direct communication from the same eSIM profile. Practically, data-only plans are simpler to activate and often cheaper per gigabyte, but they fail if a service requires an SMS verification code or a direct dial. Full service adds utility but consumes battery for radio idle states and may carry a higher base rate. Your selection hinges on whether the device should function as a standalone communicator or merely an internet pipe.
Data-only eSIMs provide internet without a number; full service adds calling and texting, so match the plan to whether you need a communicator or just a connection.
How to Pick the Right Prepaid eSIM Plan for Your Travel Style
Before you board, map your itinerary against your data appetite. A weekend city-hopper in Japan may only need a 5 GB regional pack, while a digital nomad bouncing through Southeast Asia for a month will drain 20 GB quickly, so count your streaming, mapping, and upload habits honestly. If you land in multiple countries, skip single-nation SIMs and choose a regional prepaid eSIM—it activates automatically as you cross borders, saving you the frantic midnight search for a local carrier. For short, intense trips, prioritize speed over volume; a 10 GB plan with 5G access beats a cheap 30 GB throttled option when you’re navigating rush-hour trains. Meanwhile, frequent flyers should target plans with flexible validity—like 15 or 30 days—so you never pay for unused days. Always check coverage depth: a plan boasting “global” might still lack rural towers, so zoom into your exact stops. That way, your only travel surprise is the view, not your data bar.
Matching Coverage Areas to Your Itinerary—Not Just the Country Name

Matching coverage areas to your itinerary means verifying regional zones, not just a country’s name on a map. A “Europe” eSIM often excludes micro-states like Monaco or Andorra, while a “Global” plan may route traffic through a specific network that lacks service on rural islands. First, list every city and transit hub on your route—airports, train stations, ferries. Then, check the provider’s coverage map against those exact coordinates, especially for cross-border travel, since roaming agreements vary by sub-region. Choose a plan that explicitly lists each destination, or a multi-region package, to avoid mid-trip signal gaps. Coverage validation by planned route prevents buying a plan that works only in capital cities.
Decoding Data Allowances, Validity Windows, and Speed Tiers
Decoding data allowances, validity windows, and speed tiers starts with matching the allowance to your actual usage—streaming video consumes roughly 1 GB per hour, while messaging uses negligible data. Validity windows dictate the plan’s usable days, often counted from activation, not purchase, so a 30-day plan spanning a 14-day trip leaves wasted coverage. Speed tiers separate “unlimited” plans into capped 4G/5G speeds or throttled 3G fallbacks after a high-speed threshold. A “fair usage” cap can drop you to 128 kbps without warning, making navigation painfully slow. For a two-week city break, a 10 GB, 15-day, 4G-tier plan usually hits the sweet spot. Decoding data allowances, validity windows, and speed tiers prevents overpaying for unused validity or stalling mid-trip. Q: How do I decode speed tiers if I only need light browsing? A: If light browsing is your goal, prioritize the lowest speed tier that supports 3G—typically fine for email and maps—only upgrade to 4G/5G if you stream or upload photos regularly.

A Step-by-Step Guide to Activating and Managing Your Digital Line
When you land in a new country, your prepaid eSIM becomes a lifeline, and knowing how to activate and manage it turns stress into ease. First, scan the QR code from your provider’s email or app—your phone’s settings will guide you to “Add Cellular Plan.” Once installed, label the line (e.g., “Travel Data”) and set it as default for data, keeping your primary SIM for calls. To top up, open the provider’s dashboard, pick a data pack, and payment applies instantly. For troubleshooting, toggle the eSIM on/off in Settings or re-download the profile if it vanishes. Q: How do I switch data between eSIM and physical SIM? A: In Cellular Settings, tap “Cellular Data” and select your preferred line—changes take effect immediately. Finally, monitor usage via the carrier app, and delete the eSIM in Settings when you return home, freeing space for your next trip.

Installing the Profile Before You Leave Home—Why It Matters
Installing the prepaid eSIM profile before you leave home eliminates the most common travel failure point: a lack of reliable connectivity at your destination. Without a prior install, you often need airport Wi-Fi or a local network to scan a QR code—a circular problem if your device cannot connect. By completing the installation over your home broadband, you also verify that the profile activates correctly while you still have support access. This proactive step lets you test the network selection manually, ensuring your phone locks onto the intended carrier upon arrival. Crucially, pre-departure eSIM profile installation prevents roaming surprises, as you can configure APN settings and confirm data permissions before your flight lands.
Switching Between Your Home Operator and the Prepaid Data Line Seamlessly

To switch between your home operator and the prepaid data line seamlessly, ensure both profiles are stored esim Italy on your device’s eSIM manager. On most phones, you can toggle the active line for cellular data without removing the other profile, allowing your home number to remain active for calls and SMS while the prepaid line handles internet traffic. For a smooth transition, designate one line as the default for voice and another for data, then manually override the data line when needed. Avoid disabling the home profile entirely, as this may trigger re-authentication. Seamless switching between your home operator and the prepaid data line relies on keeping both profiles enabled and using the quick-toggle in your network settings.
- Use the “Cellular Data” toggle in settings to swap data routing instantly.
- Keep the home line active but off-data to prevent fallback charges.
- Test the switch while in airplane mode to confirm both profiles load correctly.
- Set a default voice line to avoid dropped calls during the data switch.
Smart Tips to Stretch Your Prepaid Data Further
Stretching your prepaid eSIM data starts with taming background apps—disable auto-play, background refresh, and cloud syncs while roaming, as these silently drain megabytes. Use your eSIM’s native settings to set a strict data warning at 50% and switch to “low data mode” for browsing and messaging, which compresses content without slowing core tasks. Pre-download maps, playlists, and offline files over Wi-Fi *before* you activate your eSIM, so your allowance is spent only on live needs like navigation or real-time translation. For video calls, choose audio-only whenever possible, and queued downloads for later. Finally, toggle your eSIM off when idle—this single habit often saves more than any app tweak, because a dormant connection still checks for updates. These micro-adjustments turn a modest prepaid eSIM bundle into a reliable, full-trip companion.
Simple Phone Settings That Stop Background Apps from Draining Your Balance
Your prepaid eSIM balance evaporates fastest when apps sync quietly in the background. Disable background app refresh for social media, email, and streaming services—this alone stops silent data leaks. Restrict cellular data access per-app in your phone’s settings, permitting only essential tools like maps or messaging. Turn off automatic updates over mobile networks and set them to Wi-Fi-only. Enable data saver mode, which forces apps to fetch content only when you open them. Even location services, when set to “while using,” prevent constant GPS pings that nibble your balance. These adjustments put you back in control, ensuring every megabyte you bought is spent on what you choose, not what your phone decides. Background app control is your first line of defense against premature top-ups.
Combining Wi-Fi Hotspots with Your Cellular Plan for Maximum Efficiency
Pairing your prepaid eSIM with Wi-Fi hotspots is the easiest way to make every megabyte count. Before you leave the house, toggle on automatic hotspot joining, so your phone grabs free café or library Wi-Fi the second you’re in range, sparing your cellular data for true emergencies. The real trick is setting your eSIM to ask before switching, which prevents it from silently burning through your plan on weak public networks. Use a **smart data-saving configuration** that drops to 3G for background tasks like email syncing, while reserving your fastest LTE speeds for streaming or maps. This hotspot-and-eSIM combo lets you stretch a small prepaid bundle into a full week of reliable connectivity.
Common Pitfalls and Quick Fixes When Using a Prepaid eSIM
The biggest trap with a prepaid eSIM is installing it before you’re on Wi-Fi, burning your activation window while staring at a loading bar—so install only when connected to a stable network. Another classic error is assuming your phone is carrier-unlocked; a locked device will reject the profile instantly, so verify compatibility in settings *before* purchasing. Running out of data mid-trip is a silent killer—most providers hide top-up options deep in their app, so locate the “add data” button immediately after set-up. If the network won’t connect, manually select a local carrier under cellular settings instead of panicking.
Pro tip: screenshot your eSIM’s QR code and APN details before leaving home—if you erase the profile on a whim, you’ll need both to revive it without a support chat.
Finally, never delete the eSIM to “troubleshoot”—that often voids your unused data, forcing a fresh purchase.
What to Do If Your Data Stops Working Mid-Trip
When your prepaid eSIM data stops mid-trip, first toggle airplane mode on and off to force a re-registration with the local network. If that fails, manually select a different carrier in your device’s network settings, as your current one may have weak coverage. Verify your data plan hasn’t exhausted its allowance by checking the provider’s app or dashboard. **Restart your device completely** to clear temporary glitches. For persistent issues, re-download the eSIM profile through the provider’s original installation link, ensuring you have Wi-Fi or another active connection to do so.
- Check the APN settings against your provider’s documentation.
- Disable and re-enable mobile data roaming specifically.
- Contact support via a messaging app over Wi-Fi if nothing else works.
How to Check Your Remaining Balance and Top Up Without Hassle
Checking your prepaid eSIM balance doesn’t require hunting through menus. Most providers have a quick balance check via USSD code (like `*123#`) or a dedicated app section. For top-ups, use the provider’s official app or website—enter your eSIM’s ICCID or scan the QR code from your original purchase email. If the app feels clunky, try buying a refill from a third-party retailer like MobiMatter or eSIMDB, which often deliver an eSIM top-up code instantly. Always save your eSIM profile’s ICCID in a notes app, since that’s your only key to reloads if the provider’s app logs you out. Sequence for a painless top-up:
- Open the provider app or USSD menu and note the exact remaining data and validity days.
- Choose a top-up pack that matches your needs (daily, monthly, or data-only).
- Enter your ICCID or select your active eSIM profile, then pay via card or PayPal.
- Wait 1–2 minutes, then re-check balance to confirm the new allowance is live.